Tuesday, November 1, 2011

Pumpkin Cookies

Nothing says fall like my favorite fall baking ingredient.... pumpkin!! Love love love. I've made pumpkin breads, pancakes, muffins, cupcakes, but this is the first recipe I've found for cookies so I had to try it out. Credit goes to another blogger at http://sweetpeaskitchen.com/2010/09/30/pumpkin-cookies-with-cream-cheese-frosting/ because I only changed one little thing from her recipe. Happy Halloween!


Cookies:
2 1/2 cups flour
1 tsp baking soda
1 tsp baking powder
2 tsp ground cinnamon
1/2 tsp ground nutmeg
1/2 tsp ground cloves
1/2 tsp salt
1/2 cup (1 stick) softened butter
1 cup white sugar
1/2 cup brown sugar
1 can pumpkin puree
1 egg
1 tsp vanilla extract

Mix dry ingredients together in small bowl. In separate larger bowl, blend butter and sugars until smooth, then add egg, vanilla, and pumpkin and mix completely. Gradually add dry ingredient mixture to the wet mix. The dough is pretty sticky so this next step can be tricky, but form the dough into small balls and roll in sugar to coat. Place on ungreased cookie sheet, then gently flatten each with a thumb so they're not too thick. Bake at 350 degrees for about 20 minutes or so.

When cooled, mix up the frosting:
4 oz cream cheese
3/4 cup powdered sugar
1/2-1 tsp pumpkin pie spice

Blend until smooth, then add to a ziploc baggie. Cut off a tip of the bag and use to pipe frosting on each cookie in desired pattern. Pumpkin-y goodness!! Nice and chewy in the middle with a little bit of a crust from the sugar coating, and the frosting is the perfect little accent.


And although I didn't use it in the cookies, I couldn't resist sipping on a little pumpkin beer while I made these, just to enhance my little pumpkin mood!

Sunday, September 11, 2011

S'mores Cupcakes

The first annual Cochran family get-together was this year in the Arbuckle wilderness area in nowhere Oklahoma. All 20 something of us lived in one big lodge for the weekend. Being all campy-feeling, I though s'mores would be appropriate, but there was a burn ban in Oklahoma so that meant no camp fires. So.... I came up with s'mores cupcakes! I googled a few recipes, and turns out there are lots of different ways of doing this. So, I combined a few recipes and my own ideas. They turned out okay, but I think I'll try a few things different if I make them again.


For the cake:
Mix up a yellow cake mix per the package directions. Separately, crush up graham crackers until you have about 1 cup of crumbs. Fold these into the cake batter for a graham cracker cake, put into cups, and bake according to the mix directions. When cooled, dig out a little hole in the center of each cupcake.


For the chocolate middle:
Melt down some Hershey chocolate bars in the microwave, and fill up the holes in the cupcakes with the melted chocolate, letting it run out the top so you can spread a layer over the top of the cupcake. This is something that needs some work because while it turned out great right afterwards to have a gooey chocolate center, the next day the chocolate hardened in the center and left a little chocolate turd in the middle of the cupcakes. Good, but not quite what I was going for.


For the marshmallow frosting:
Blend a jar of marshmallow fluff with a stick of softened butter. Then gradually add in about 2-3 cups powdered sugar and mix until smooth. Dollop a spoonful onto the tops of each chocolate-filled cupcake. This frosting was a little thin, so it ended up running down the side instead of staying nice and perky. And, it tasted a little to sugary sweet instead of marshmallow-y, but not sure what I could have done about it other than using more fluff and less powdered sugar?

Finally, a garnish of a graham cracker! I wanted to toast these in the broiler to give the marshmallow a toasty look, but the oven at this lodge didn't have a broiler.

Have one, then have s'more!

Friday, September 9, 2011

Chocolate Peanut Butter Cake Balls

I think the title is pretty self-explanatory of what these are. Balls of chocolatey peanut buttery goodness!


I made just a regular ol' box of chocolate cake (which by the way smelled so so so good. I think I want a candle called "warm chocolate cake"). After it cools, crumble it up. Looks like dirt. 


Instead of using frosting, I used straight creamy peanut butter. I stirred in almost a whole jar because it required that much to get to the right consistency. Unfortunately, I think this resulted in too much peanut butter and not enough chocolate, but for some that's okay. Me, I prefer more chocolate, but I guess I can't always have my way.


Ball it up, then let them chill (freeze) for a few hours. Melt down some vanilla candy chips or almond bark. Dip each ball into the coating and set on wax paper to cool.

For the finishing touches, melt down a Hershey chocolate bar and scrape it into a plastic baggie. Cut off a small tip and use it to drizzle chocolate over the tops of the balls. This really made the balls look a lot nicer!


Yum yummy!


Wednesday, August 17, 2011

Cookie Dough Cupcakes

Yes you read the title right... two of the best things in the world, cookie dough, in a cupcake! This is an idea I've been wanting to try for a long time, so here it goes!


I used just a regular box cupcake mix, but picked out one that sounded extra rich, a golden butter mix. I'm so used to adding eggs and oil to a mix that I was taken aback when it said to add solid butter. The batter tasted pretty yummy but the cake was a lot denser than normal and, I thought, it turned out a little dry. If these had been plain cupcakes I would have called them a failure, but the cookie dough made up for it!

Next, make your favorite cookie dough, or just do what I did and buy the pre-made Nestle stuff. I even got the kind that was pre-separated into balls, but I ended up having to reshape them all smaller because they were a little large for my small cupcake cups. No big deal - I just ate the leftovers :-) And, I discovered that cookie dough dipped in cake batter is awfully yummy as well! Mmmmm.


Fill cupcake cups with cake batter, but not quite as full as a normal since the cookie dough will cause some volume displacement (what's the name of that physics principle?). Then just set a ball of dough on the top of each. Here is where I was glad that the mix was dense because they didn't immediately sink, but as you bake them they will sink to the bottom. Bake according to the cake mix directions. I found that the cookies baked throughout, I was kind of hoping there would be a little raw cookie dough in the very center, but nope. Oh well, still yummy!


And now here's the fabulous top-off for these little babies.... the cookie dough frosting. Yes yes yes. It basically is the recipe for cookie dough from scratch, minus the eggs and flour. Blend 3 sticks of butter (hellooo calories) and 3/4 cup brown sugar. Add in 3.5 cups powdered sugar to make it frosting-y. Then, top off the flavor with 1/2 tsp salt, 2 Tbsp milk, and 1 tsp vanilla. Spread on the cupcakes, and sprinkle on some chocolate chips!


Nice enough on the outside....


Yummy little treasure on the inside!!

Wednesday, July 13, 2011

4th of July Cupcakes

These were the fun fun fun cupcakes I made for, well obviously, July 4th. My aunt Anita gave me these cool little things to make two-color/flavor cupcakes (called Batter Babies) and I've been dying to try them out, so I thought a holiday that focuses on a set of specific colors would be appropriate :-)


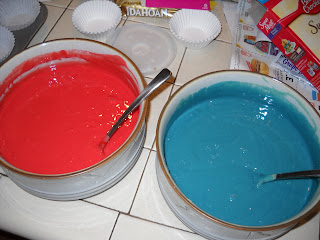
I just made a box french vanilla cake mix, but added to it a package of dry french vanilla pudding mix for extra moisture. Then, I divided the batter into two separate bowls and dyed one red and one blue. It took quite a bit of food coloring (though not nearly as much as the green velvet balls!).


Popped in the batter babies, which struggled a bit to stand upright, but I finally got them to balance. It was a little tedious and time consuming, but had to add each color separately, being careful not to knock over the dividers or spill a color into the wrong half. And, I only had 6 dividers, so I could only do a half of a pan at a time.


Bake according to the box mix directions, let cool, and frost. I didn't have time or energy to do homemade frosting, so I cheated and used a tub of pre-made cream cheese frosting. I still loaded it into my frosting piper thingamajig and did my best to apply the frosting in the shape of white stars on the tops of the red and blue cupcakes. 


Finally, sprinkled the tops with both red (strawberry) and blue (blue raspberry) Pop Rocks, which by the way took forever to find - I went to 5 different grocery/convenience stores with no luck and finally had to get them at the over-priced candy store in the mall. 


It's a fireworks party in your mouth!! Happy Independence Day!!

Thursday, June 30, 2011

Dr. Pepper Cupcakes

Happy birthday daddy! In trying to think what to make him for dessert, I knew he liked chocolate cake, but I wanted to do something a little more exciting. As I was craving some diet dr pepper to drink for a caffeine fix, I put the two together and...... Dr Pepper Cupcakes!


After a google recipe search (because I'm not yet brave enough to make up my own recipe from the ground up), I found one and made a few small modifications to make this:

1 German chocolate cake mix
1 small instant vanilla pudding mix
1 cup vegetable oil
4 eggs
12 oz Dr. Pepper (not diet)
8 oz cream cheese
1 stick (1/2 cup) butter
1 tsp vanilla
splash Dr. Pepper
about 2-3 cups powdered sugar
about 1/2 tsp cocoa powder

Mix together the German chocolate cake mix and vanilla pudding mix. Then, using a mixer on low-medium speed, slowly add in the eggs and vegetable oil. Yes 1 cup is a lot of oil, and these cakes were pretty darn moist, so you could probably decrease this a little if you want. Then, add 12 ounces (one can, or 1.5 cups) of Dr. Pepper - add in portions since it fizzes when you pour it into the mix. Also, pour another glass of dr pepper to sip on while you finish up :-) Once blended, pour into cupcake cups and bake at 350 for about 20 minutes.


For the frosting, blend the softened cream cheese and butter on low speed. Gradually add in powdered sugar in portions, blending each time. Add a little cocoa powder, more or less depending on whether you want a more chocolate or vanilla flavored frosting. Add the vanilla and a splash of DP, mixing well. Add more powdered sugar as needed, but don't get too much because it'll get too sweet.

(I have yet to perfect this whole frosting thing - for some reason it is always pretty thin. Maybe I mix it too much and it gets warm? Any suggestions anyone on how to keep it thick without adding gobs and gobs of powdered sugar?)


And now for the fun part - frost the cupcakes (once cooled of course), then top with multicolored sprinkles. I had an inspiration of an ice cream float, so just for kicks and giggles I cut off the tips of bendy straws and stuck them in for decoration. Then a little marachino cherry on top!


Enjoy with a glass of milk. Or Dr. Pepper. Or both :-)

Wednesday, June 22, 2011

Fun-Fetti Cake Balls!


There are lots of dessert-worthy events in the months of April through July: my parent's anniversary, my  birthday, mother's day, Memorial day, mom's birthday, father's day, our anniversary, dad's birthday, 4th of July, Chris's birthday... And so despite me trying to lose the 6 pounds I've put on since living at home, I had to make mom some Birthday Cake Balls.

Make a box mix of confetti cake then, once cooled, crumble up into fine multi-colored crumbs. Then, stir in most of a can of funfetti frosting to make a "glue" for the cake crumbs. Once it's a nice doughy consistency, stick in the fridge overnight. The next evening, make the dough into balls, about ping-pong sized, then stick them in the freezer for awhile.


In the meantime, melt down the candy coating - this time I used 3/4 package white vanilla candy coating and 3/4 bag white chocolate chips. And (another benefit of living at my parents' house) is that I had a real double-boiler to use, which was very handy.

Take only 4-6 balls out of the freezer at a time because you don't want them to get too warm. This is something I learned since my last cake ball attempt, and it worked much better. I thought I'd try to cake pops this time and found some skewers in a random drawer. Stick a skewer in the ball, then dip it in the melted coating. Another benefit of the sticks is that I could let the excess drip off and get a more even coating than just dipping with a spoon. Set on wax paper to cool, adding sprinkles if you'd like before the coating hardens.


Bite-sized yumminess! And happy birthday mommy!!!

Friday, June 3, 2011

Honey Almond Honeycomb Cake

For my birthday, my parents got me a Honey Almond bundt cake mix and a honeycomb shaped cake pan, both from Williams-Sonoma. So about a month later on Memorial Day I decided to try it out!


 I just followed the recipe on the box, nothing special. Beat 2 sticks of butter (yes, 2 sticks.... mmm) in an electric mixture until smooth. Add the flavored sugar packet that comes in the mix and continue beating until light and fluffy. Add 4 eggs, lightly beaten, a little at a time, beating well after each addition. Finally, add the cake mix and 1 cup of milk in separate additions - add some mix, then half the milk, then more mix, then the rest of the milk, then the last of the mix. Beat until blended, but don't over mix. I always wish recipes would be more specific on what that means, I never know when is too much.

Then for some odd reason, I guess the honeycomb pan wasn't made big enough because you're supposed to take out 1 cup of the batter before adding to the greased and floured. You can pour it into a smaller pan to make a mini-cake! Then bake at 375 for 25-30 minutes. I ended up having to bake it for maybe 15 minutes longer because it wasn't setting up all the way in the middle.


When done, let cool in the pan for about 10 minutes, then flip the pan over to dump out the cake onto a cookie sheet/cooling rack. In the meantime, make the honey glaze: Melt 2-3 Tbsp butter in a saucepan over medium heat. Add 1/2 cup honey and 2 Tbsp water and stir until it simmers. I also added a blurb of vanilla extract and a sprinkle of brown sugar.


When the cake is out (but before fully cooled) brush the glaze onto the cake. Let cool completely before serving. I sprinkled it with powdered sugar and served it with blueberries, strawberries, and vanilla ice cream.


Saturday, May 14, 2011

Oreo Cupcakes

The last few weeks have been super busy – finishing up pharmacy school, moving in with my parents in Wichita, starting a brand new job… but now we’re finally on our way to our week long vacation in Ft. Lauderdale. But, despite all that’s been going on, I did still squeeze some baking in. So, now that I have a 2 hour layover in Houston on our way to Florida, I thought I’d catch up on some blogging!

I wanted to make something for dessert for our family’s get-together on Mother’s Day. So, since it was Mother’s Day, I obviously asked my mom what kind of cupcake she wanted. She requested Oreo cupcakes because she’d had some at work a few days earlier and loved them.  I didn’t have a recipe, but she told me how her friend at work had made them. And, of course, every step I did ever-so-slightly differently was compared to the previous cupcakes I was trying to live up to. Oh mom. But of course, “I’m not criticizing!” was what she said. I know that, that’s just how she is – picky about details and keen to point out every little thing. Anyway, here they are, and they turned out yummy!  Happy belated Mother’s Day mom!


Oreo Cupcakes:
1 box Oreos (you won’t quite use all of them in the cupcakes, but you have to factor in the few you’ll snack on while baking!)
1 box white or vanilla cake mix and it’s respective ingredient requirements (eggs, oil, water)
One can of mini to-go Oreos for topping
Cream cheese frosting – I did mine homemade with 1 stick butter, 1 stick cream cheese, dash of vanilla extract, a few cups powdered sugar, and some Oreo crumbles.


 Twist off the tops of 24 Oreos and line the bottom of each cupcake wrapper with the frosting-free side (keep the other halves!). Mix the cake mix according to directions, then stir in the crumbled up Oreo leftovers. I added a couple more into the mix too. Blend well, but allow the Oreos to remain chunky – don’t crumble them up too finely.  Pour batter into Oreo-lined cupcake cups and bake according to the cake mix directions – I think it was 325 degrees for 20-25 minutes or so. In the mean time, make the frosting (or use canned if you’re lazy), and stir in a few more crumbled up Oreos. The Oreos in the frosting can be finer texture, almost powdery. Frost the cupcakes when cooled, and top with a decorative whole mini Oreo. Must enjoy with a big glass of milk J


This mix for some reason also happened to have enough left over to make an 8-inch round pan single-layer cake. I think it is because I had to use my mom’s cupcake pans (since mine are packed in storage) and her cups are smaller. Ha ha. True story.

Enjoy! 

Monday, April 25, 2011

Strawberry Key Lime Cupcakes

With the coming of spring, I was craving something light and refreshing. Sara Sara has some yummmmy super moist strawberry cupcakes, so I thought I'd try my own. Then, after sipping on a strawberry limeade from Sonic, I thought a lime frosting would go perfectly. I found two separate recipes and combined them for this:


Strawberry Cupcake:
18.5oz white cake mix
3 oz pkg strawberry Jello mix
4 eggs, beaten
3/4 cup oil
1/2 - 1 cup strawberries, sliced

Combine cake mix, jello mix, eggs, oil, and undrained strawberries. Fill cupcake cups, and bake at 325 for 18-23 min. Allow to cool, then frost with:

Key Lime Cream Cheese Frosting:
8 oz cream cheese, softened
1/2 cup (1 stick) unsalted butter, softened
2 Tbsp key lime juice
1 tsp key lime zest
2-3 cups confectioner's sugar
Few drops green food coloring

Cream the butter, cream cheese, lime juice, and zest with electric mixer until light and fluffy. Add confectioner's sugar, one cup at a time. Continue beating until light and fluffy. Add a few drops of green food coloring, if desired.

The strawberry cupcake was super moist, maybe even a little too much if that's possible! And they rose quite a bit, so make sure you don't fill the cups too full! (maybe only about halfway). The key lime frosting was the BEST part of this recipe, it was so refreshing and good... tasted just like key lime pie! As yummy as these were, I felt like the frosting overpowered the strawberry flavor of the cake - all I tasted was the lime, and not much strawberry. So I added a sliced strawberry on the top, just for looks, to trick myself into thinking more about the strawberry :)